Long, long ago, I was at the Kiwanis thrift store in downtown Ann Arbor one Saturday morning. This was a rare enough event in itself, because this cavernous and bustling store, staffed only by retiree volunteers, was only open on Saturday mornings, from 9:00 until noon. In addition to the kitchen utensils, furniture, tools, antiques, vintage clothing and outdoor items distributed among its three and a half floors, the entry on the main floor greeted bargain hunters with thousands of used books, largely uncategorized, and all available for a dollar or less each.
I am the sort who is always mesmerized by a shelf of cheap books. But I rarely have the patience to go through a stack of unsorted books on the off chance that there is something I want. This morning I was more patient than usual, and I was very lucky.
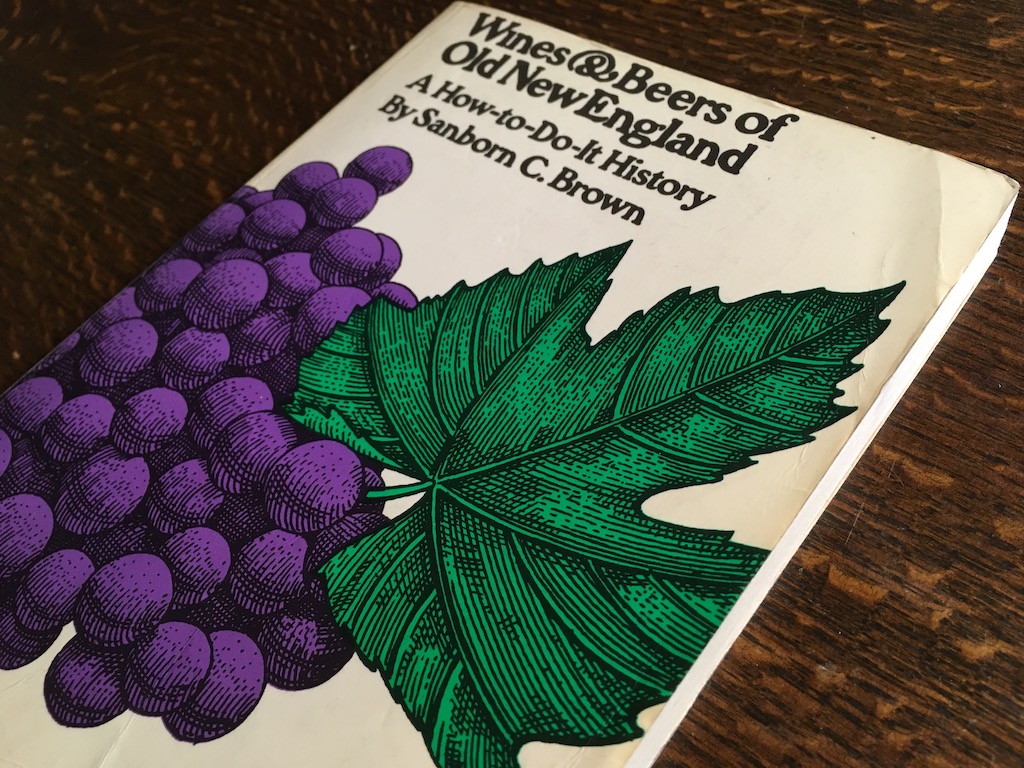
It was Wines and Beers of Old New England: A How-to-Do-It History, written by Sanborn C. Brown and published in 1981. This book was a fascinating mix of history and practical advice, and it would end up setting the tone for many of my future winemaking activities. I immediately grabbed it, paying about 50 cents to take it home.
Now let’s move the clock forward a couple of years. By this time I had moved to Seattle to attend the University of Washington. I had brought this book with me. I still hadn’t quite gotten to homebrewing, except a couple of failed attempts back in Ann Arbor which I attributed to the use of chloramine in the municipal water. But almost in unconscious compensation, having gotten settled in Seattle, I selected a walkup apartment in a benignly neglected, classic building next to a brewpub, where excellent beer could be bought cheap by the gallon.
It’s my experience that when good beer can be had for cheap, it tends to attract intelligent people. Accordingly, this pub had a crowd of very intelligent regulars, ranging from graduate students to itinerant craftsmen to retired faculty.
One day, I was at the bar talking with Dick Davisson, a semi-retired member of the Physics department at the University of Washington. It was about 1996.
The conversation had turned to brewing, and somehow the discussion became mingled with Dick’s stories of his time in New England, and particularly his time studying Physics at MIT. This was the perfect juncture to mention that I had an amazing book about brewing, written by nothing less than an MIT professor of Physics! I promised I would bring the book by. Which I did, within all of five minutes. It was very convenient living next door.
I showed him the book. He took one look at it and said, “Oh, it’s by Sandy Brown!” He had known Sanborn C. Brown while a student at MIT, and had not been aware that the man, as well as being a brilliant physicist, was also something of a historian on brewing practices. The book was published in 1981, posthumously. Dick was sincerely sad to hear that he had passed. I loaned him the book. Within a few weeks it had circulated among much of the brewery staff as well.
Coming back to the present, one of the many things that I continue to enjoy about this book is that the author is a very encouraging coach. Brown has peppered his book with statements like “You should try this yourself,” usually in the midst of describing something so archaic that you otherwise would have lived your life without even knowing such a thing ever existed.
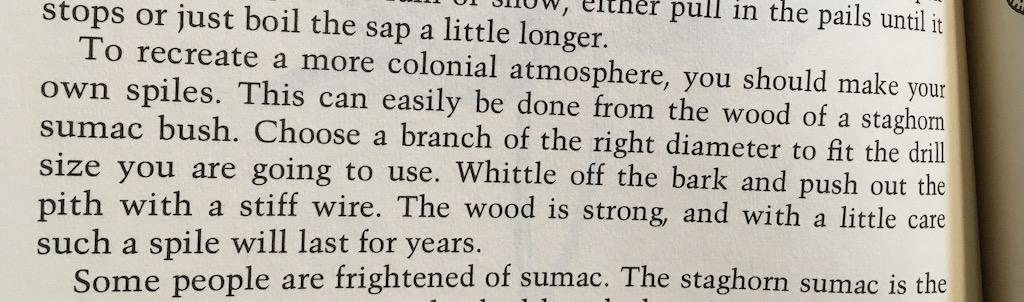
A large portion of the book is devoted to the question of where colonists in New England found the sugar necessary to make wines and beers. One of the sources was maple syrup. He explains that the colonists improved on the Indians’ methods of gathering maple sap by discovering that it could be collected by drilling a hole in the tree and inserting a short tube to let the sap drip out into a bucket. The tubes were carved out of wood, and were called spiles (as producers of maple syrup continue to call them today).
One snowy January day not that long ago, I pulled out the book and fell into the chapter on maple sugar. I became intrigued when I read the passage below. “You should make your own spiles,” Sandy enthused, and ensured us that it’s easy if you have some staghorn sumac growing in the neighborhood. I do. And not far from the house there are silver maples, Norway maples, and box elders. Once again, Sandy is encouraging, assuring us that you don’t need sugar maples to make maple syrup — they are just the choice of commercial growers because they have a somewhat higher sugar content. Any maple (and box elder is a variety of maple) will do just fine.
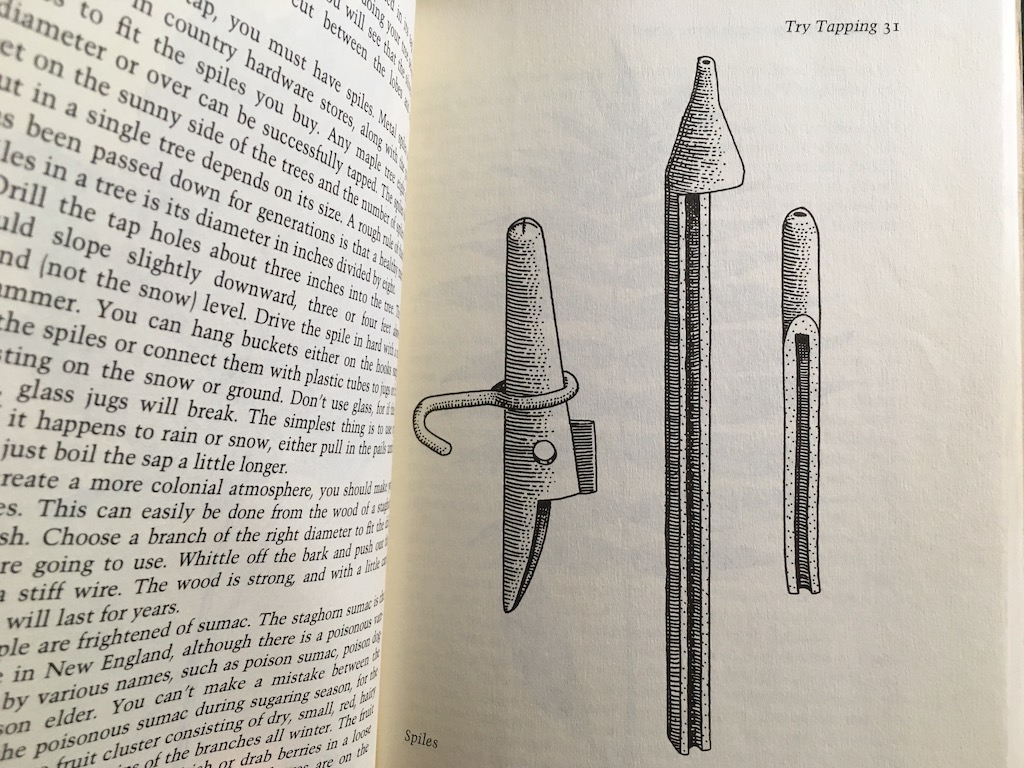
This is how Brown suggests our sumac spiles should look. To the left is a standard metal spile, while to the right are two versions of a sumac spile. I hadn’t carved sumac yet, so wanted to see if these shapes can be achieved as easily as he suggests.
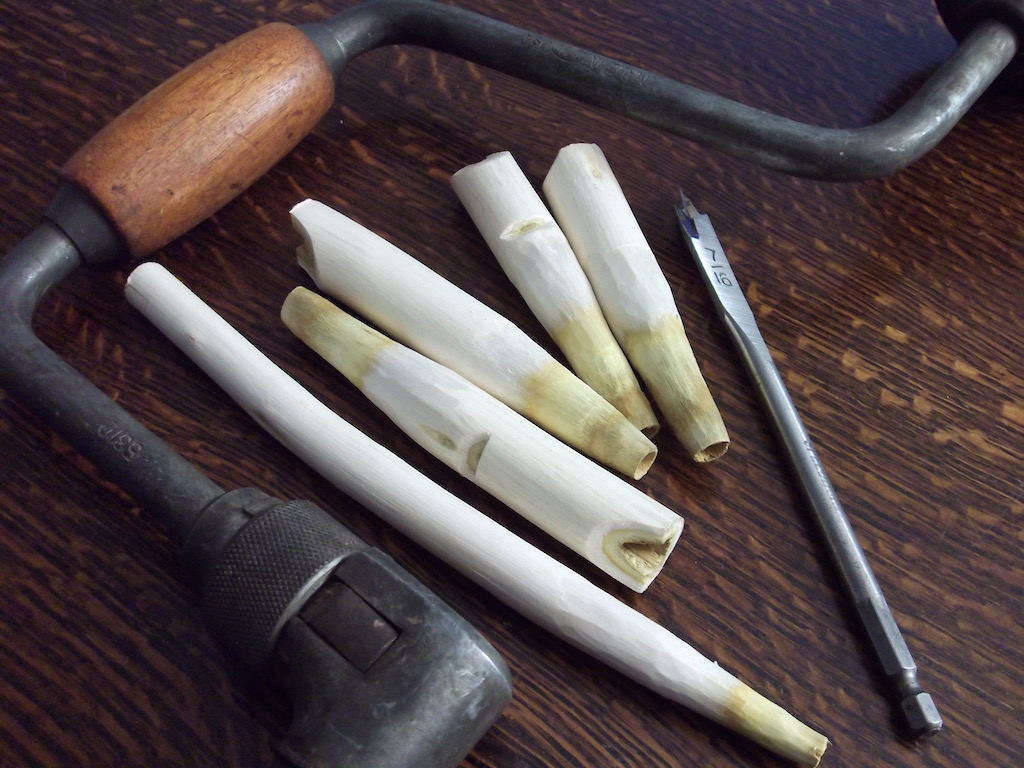
On a January day, the concept of making maple syrup in March over a big bonfire is very appealing. So I went outside and located the bare stems of several young sumacs, whose brittle branches snapped off easily in the brisk January cold. I could see the pith inside — a yellowish-brown, fibrous substance running through the very center of each stick.
Soon I find that I am thoroughly enjoying this impromptu outing. I choose some branches that are about 3/4 inch thick by about 12 to 16 inches long. I bring them in and look for a stiff wire. I settle on a thick piece of copper grounding wire, about 1/8 inch thick. Then I cut off a length of sumac, about eight inches, that looked straight and free of knots. By now, the sticks have warmed up and the pith is softer than it was.
With a lot of pushing and twisting, I am able to insert the wire into the pith, but it doesn’t exactly “push out the pith.” Instead, I find myself in a diligent session of in-out with the stick, inserting and removing the wire, back and forth, over and over. Gradually, a lot of pieces of pith and pith dust are dislodged and fall to the table, while the rest of it seems to be compressed against the inside of what has now become a little wooden tube, worthy of becoming a flute. With a bit more work, all of the pith seems to be out.
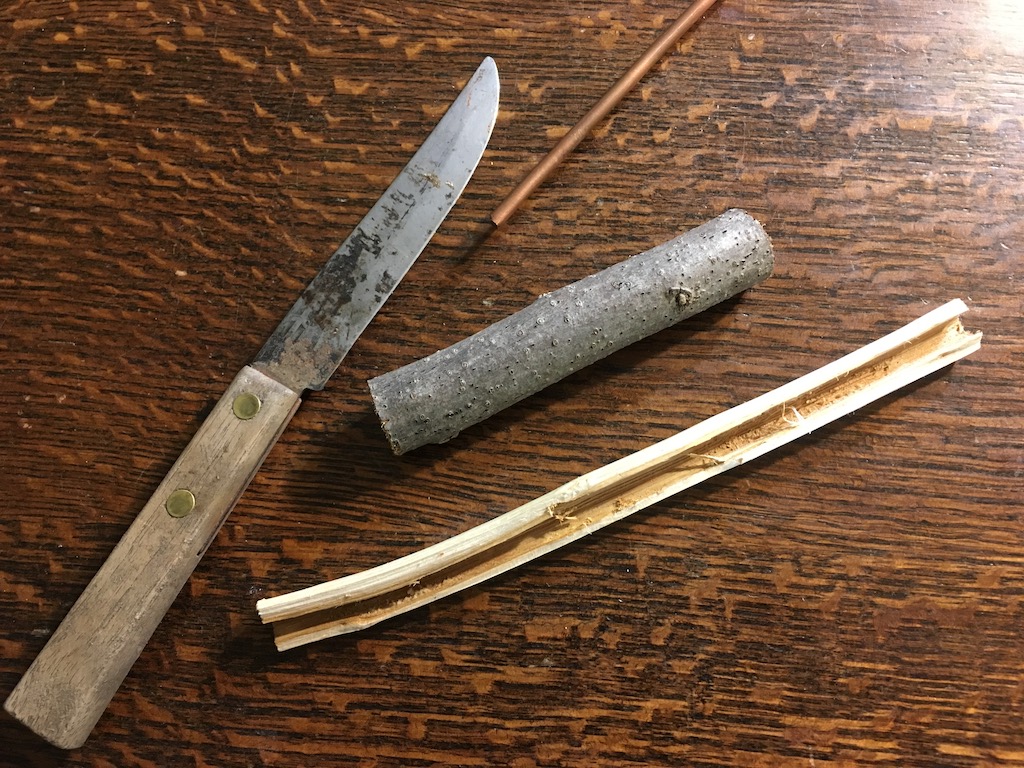
Once the pith is removed, the general idea is to whittle down one end of the tube to a taper of the proper diameter to be inserted into a 7/16-inch hole in the tree (Sandy is silent on the diameter but 7/16 seems to be the prevailing choice). I also whittled off the gray bark to expose a more pleasing, clean white surface. Going deeper, as you must to create the narrow end, exposes the heartwood, which is colored a very interesting greenish-yellow.
Below shows my first attempt at making two spiles. I saw no reason to whittle away the side of the tube to form an open channel, as Brown seems to illustrate (unless it is intended as a cutaway view).
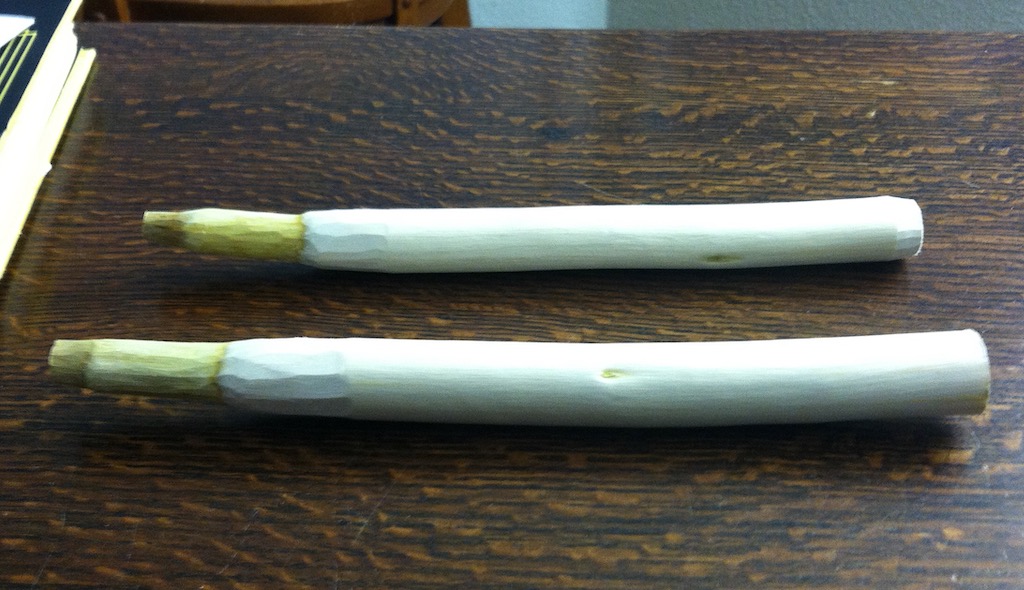
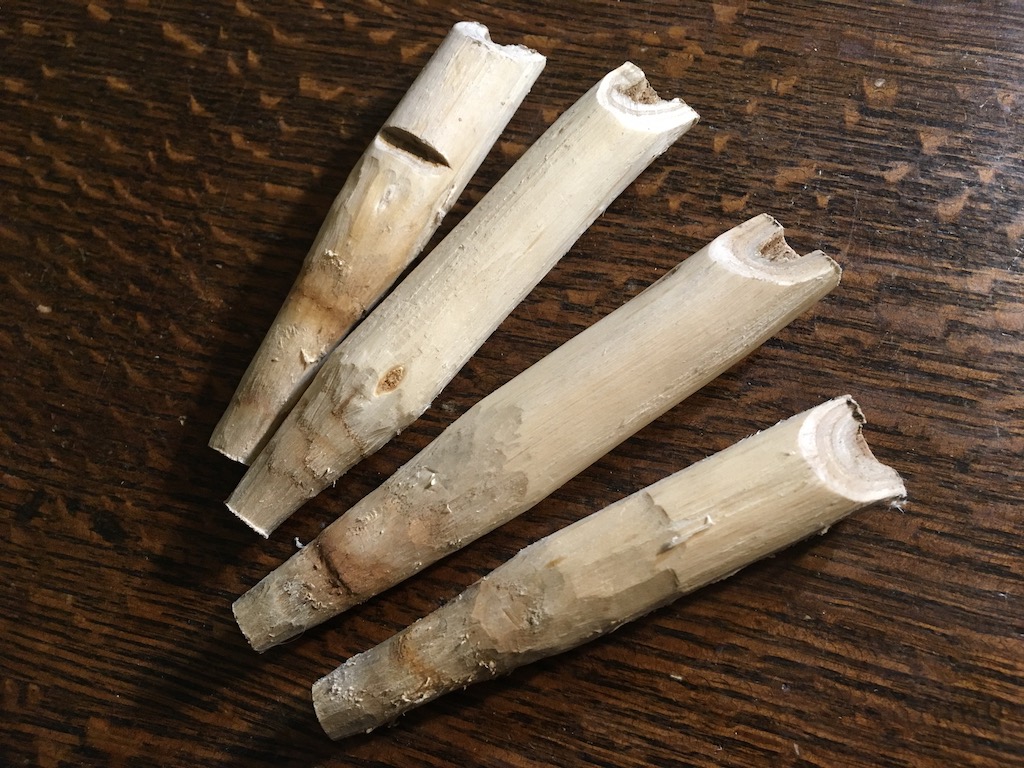
After a bit, I realized that the spiles could be much shorter than this. I cut each one in half, and proceeded to carve four shorter, stubbier spiles, about four inches long. For style, I notched the end of each, and cut a little groove on the upper surface, as if to hang the collection bucket by. But these are only stylistic touches, and are not functional. As Brown would say, you should try this yourself.
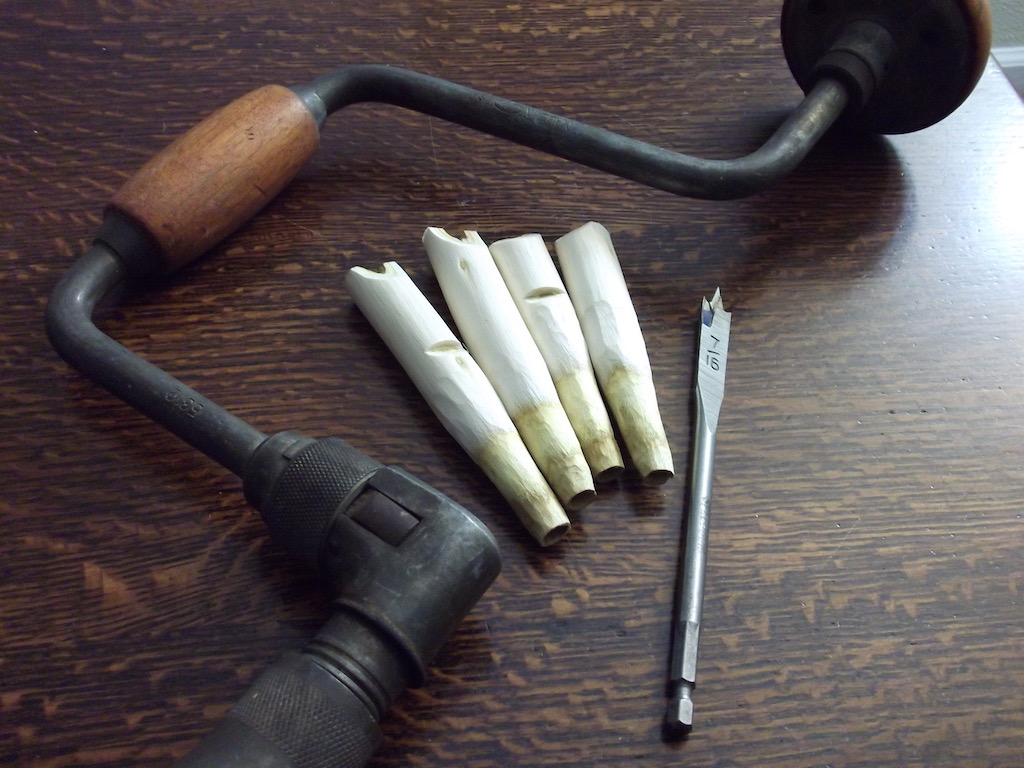
And so, now having my spiles, I gathered a 7/16 inch drill bit, and an old-fashioned brace-and-bit hand drill — and waited two more months, for the sap to run.
Soon it was mid-March. We had a day that was well below freezing overnight, but sunny and well above freezing in the morning. Sandy told me to look for that. That’s what makes the sap run.
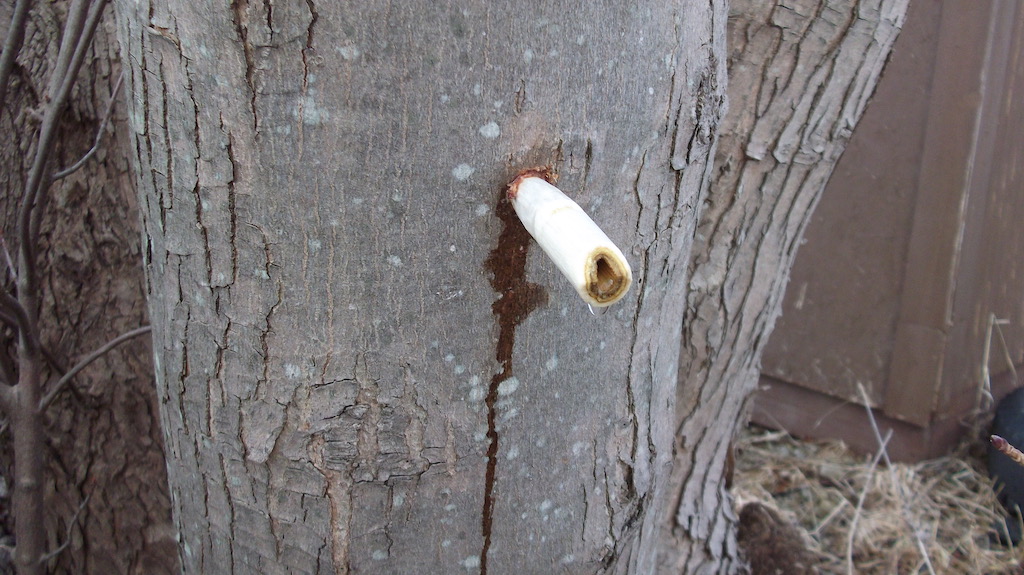
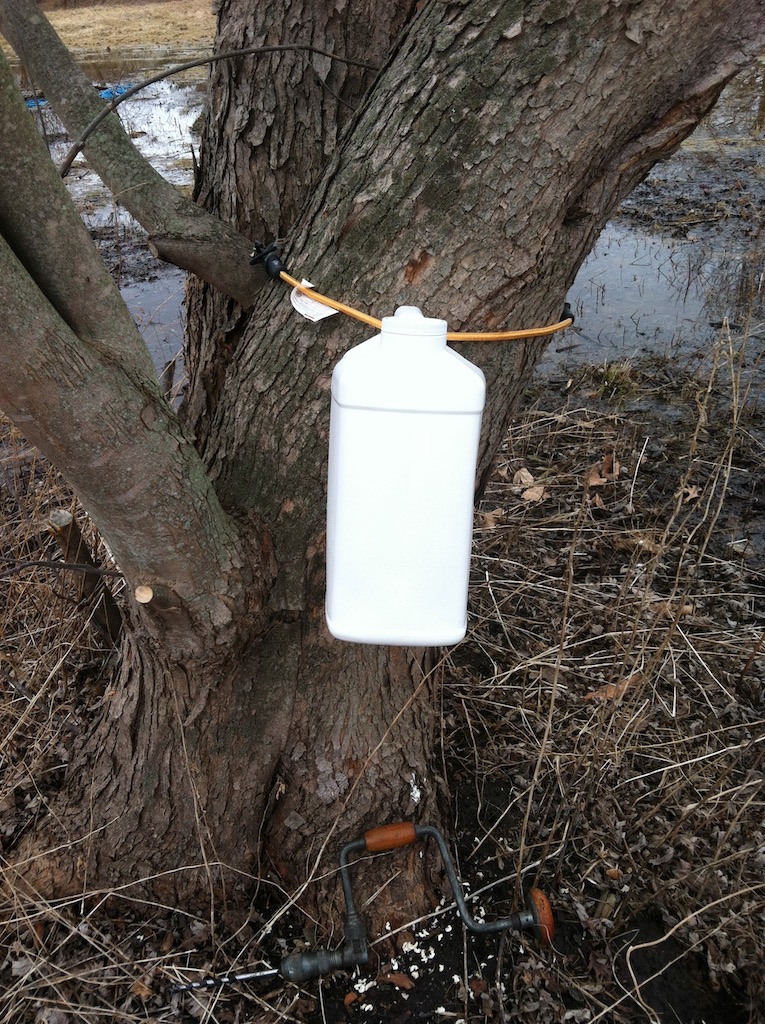
There is a big silver maple not far from the house. I drilled the hole, and inserted the spile.
It works! The tree is eager to give. The dripping you see on the bark of the tree is just the sap that dripped out in the minute or so when I was clearing the debris from the edges of the hole prior to inserting the spile.
Here is where I had to depart from Sandy’s colonial ethic. I did not yet have metal buckets suitable for collecting sap, but the sap was running now. There is a bit of irony in combining hand-carved sumac spiles with modern plastic technology, but a good collection system consists of a big plastic jug, such as the kind that cat litter is often sold in, with a hole cut in the side nearest the spout, the same diameter as the spile. Hang the jug on the spile, and secure it further by means of a bungee cord wrapped around the tree and through the handle. It will rest securely as the sap fills the jug, which can take about a day, depending on how fast the sap is running.
In his paragraph encouraging us to make spiles, Brown closes with the claim that “with a little care, such a spile will last for years.” He’s right. I gave very little care to these spiles for each of the three years I collected maple sap, and they are about five years old now. They remain completely serviceable and in excellent condition.
This is the basic technology needed to collect maple sap for the purpose of making maple syrup. With a little thought, you can even eliminate the use of plastic cat litter jugs and bungee cords — and you should.
In another article, I describe the process of boiling the sap over a wood fire to make maple syrup. At some point I hope to also describe my experience making two other things Brown recommends: maple mead (a wine made from condensed maple sap) and maple beer (home-brewed beer made with maple sap in place of water).


One Comment
Pingback: